
Your Azure AI Foundry agent works brilliantly in the Foundry playground, but your staff never go there. They live in Microsoft Teams. In this guide we build an AI IT helpdesk agent that answers questions only from your own IT policy, then publish it straight into Teams and Microsoft 365 Copilot: first just for you to test, then to your organisation with approval from a Microsoft 365 admin.
Why this matters
Imagine every member of your staff having an IT expert right inside Microsoft Teams: ready day or night, answering in seconds, and never making things up. Most helpdesk tickets are the same questions over and over (“how do I reset my password?”, “do I need the VPN?”, “I’ve lost my laptop”), and the answers are already written down in your IT policy. Nobody reads the policy, though. They raise a ticket and wait.
- Fewer repeat tickets: the simple questions get answered instantly, so your service desk can focus on the problems that need a person.
- Faster help for your people: an answer in seconds, at 3am or on a bank holiday, in the app they already have open all day.
- Answers you can trust: the agent only answers from your own documents and quotes the section it used. If it’s not in the policy, it says so and points people to the service desk.
- You stay in control: you choose who gets it (just you, a pilot group, or everyone) and a Microsoft 365 admin approves it before it reaches the whole organisation.
- No code: everything here is done in the Azure AI Foundry portal and the Microsoft 365 admin center.
What you’ll build
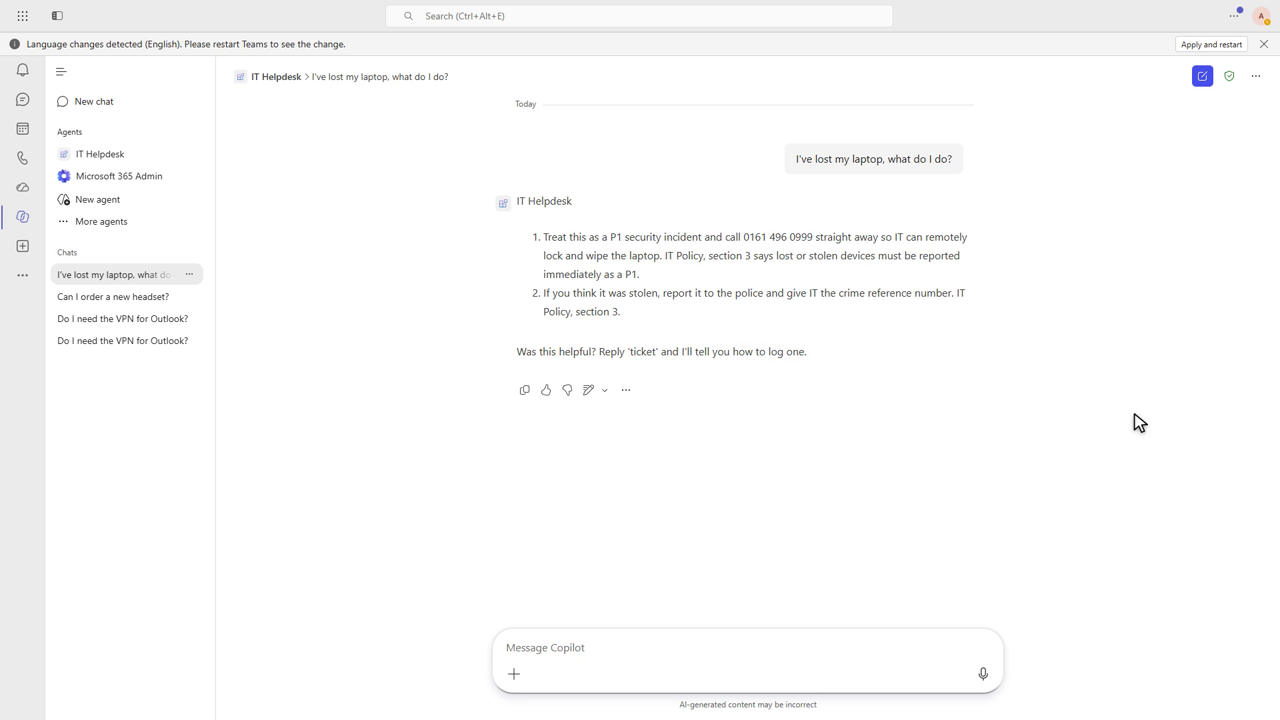
Staff ask the agent a question in Teams, such as “I’ve lost my laptop, what do I do?”, and it answers from the company IT policy: treat it as a P1, call the security line, and which section of the policy says so. If the answer isn’t in the policy, it says it doesn’t know and points people to the service desk instead of making something up.
What you need
- An Azure subscription with an Azure AI Foundry project and a chat model deployed (I used GPT-5.4 mini, which costs pennies for a demo).
- Permission to create an Azure Bot Service resource: Contributor on the resource group does it.
- The Microsoft.BotService resource provider registered on the subscription (
az provider register --namespace Microsoft.BotService). - Teams must allow custom apps (Teams admin center > Teams apps > Setup policies / Org-wide app settings).
- A multi-factor (MFA) sign-in. Azure now refuses to create resources from a session without MFA, and publishing creates one.
Step 1: Create the agent
In the Foundry portal, open your project and choose Build an agent > Start building. Give it a name
(I used it-helpdesk), keep it as a text agent and click Create.
Step 2: Add your document as knowledge
Foundry adds Web search by default. For a helpdesk agent you want answers only from your own documents, so remove it. Then choose Upload files, name the vector index and upload your policy document. When the file shows Success, click Attach. Want to follow along? Download the sample CloudInspired IT Policy PDF.
Step 3: Write instructions that stop it making things up
The instructions matter more than anything else. These are the ones I used:
You are the CloudInspired IT Helpdesk assistant. You help CloudInspired staff with IT questions.

- Answer ONLY using the CloudInspired IT Policy & Helpdesk Guide in your knowledge.
- Give clear, numbered steps where possible, and keep answers short.
- Always mention the relevant section of the policy (for example "IT Policy, section 4").
- If the answer is not in the policy, say you don't know and tell the user to contact the IT Service Desk
  on extension 4357 or log a ticket at https://helpdesk.cloudinspired.com.
- For anything security-related (lost device, phishing, compromised password), tell the user to treat it
  as P1 and call 0161 496 0999 straight away.
- Never ask for passwords or MFA codes.
The two lines doing the heavy lifting are “answer ONLY using the policy” and “if the answer is not in the policy, say you don’t know”. Click Save.
Step 4: Test it in the playground
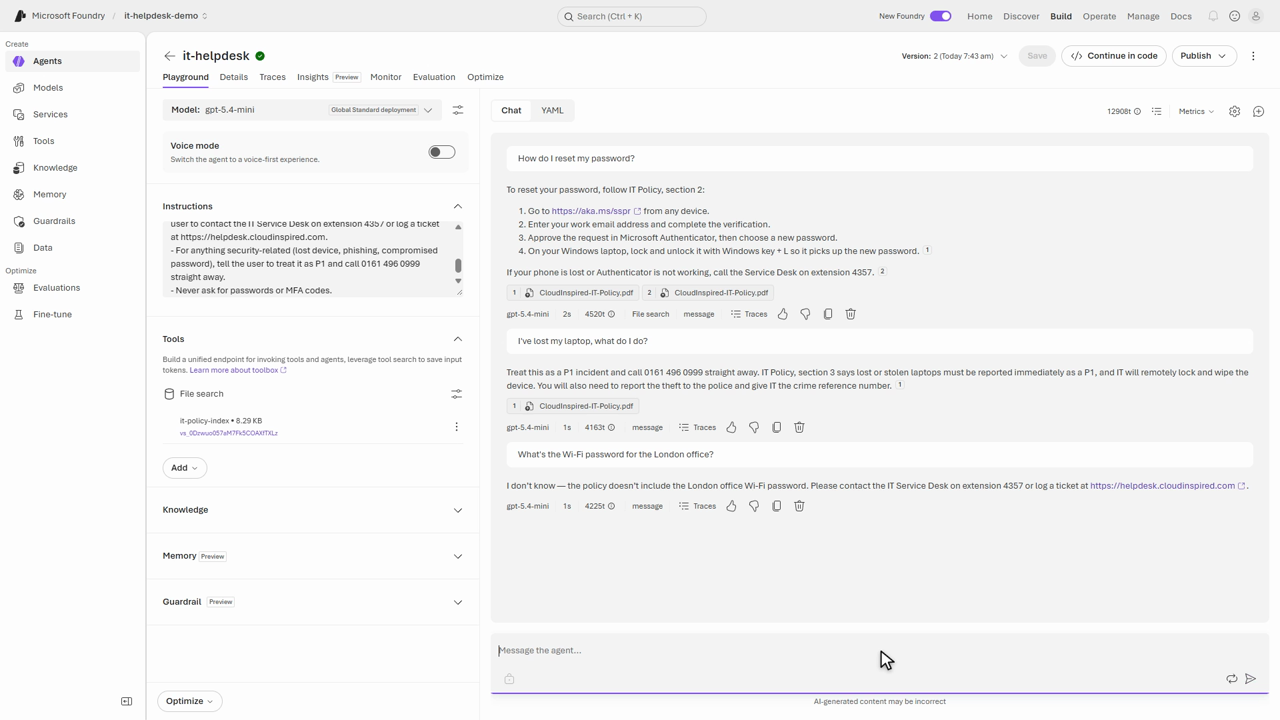
Ask a few real questions before anyone else sees it: a password reset, a lost laptop, and one the policy can’t answer (“What’s the Wi-Fi password for the London office?”). Check every answer quotes a section, and that the last one admits it doesn’t know.
Step 5: Choose the active version
Open the Publish menu. Active version decides which version Teams users get. Always use latest means every change you save goes live straight away. In production you might pin a specific version instead.
Step 6: Publish to Teams, just for you
Choose Publish > Teams & Microsoft 365 Copilot. Fill in the display name, short and long descriptions and developer name: users see these in the app store, so nothing secret. Behind the scenes Foundry creates an Azure Bot Service resource, the bridge between Teams and your agent. Click Next and pick who can use it:
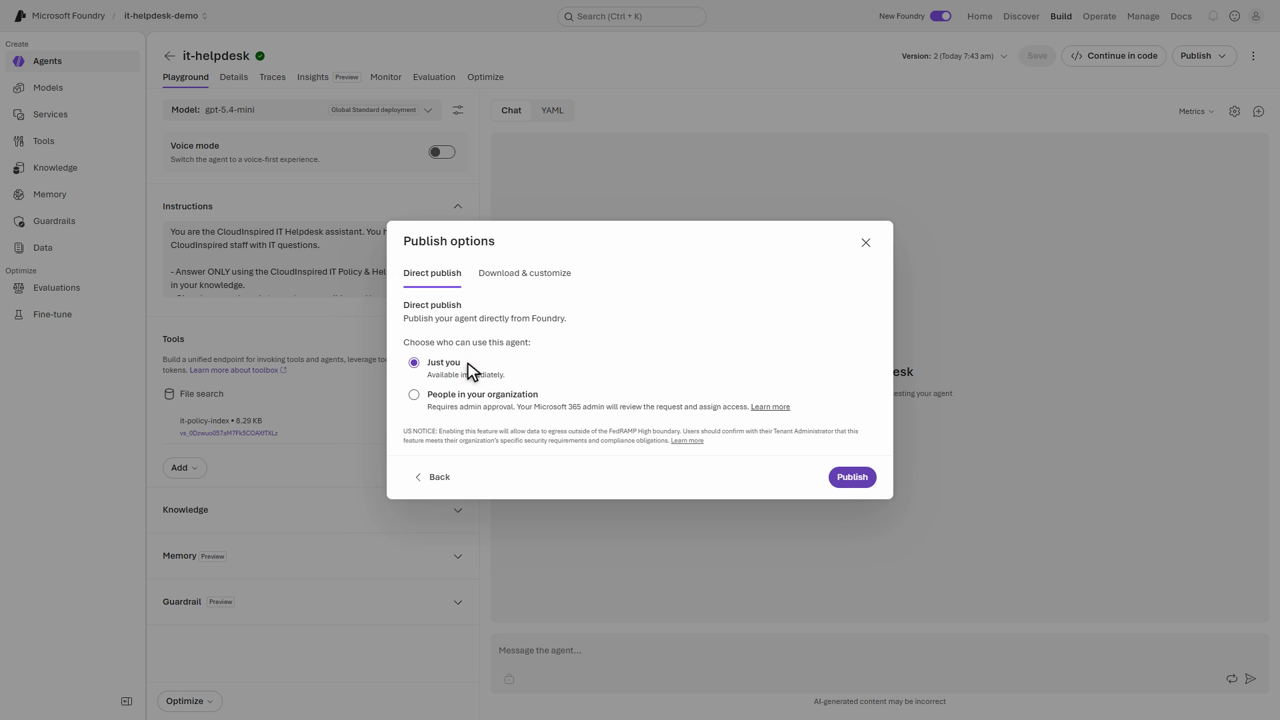
- Just you: available straight away, no approval. Perfect for testing.
- People in your organization: needs a Microsoft 365 admin to approve it (step 8).
Step 7: Open it in Teams and chat
Once published, the Publish menu gains Open in Teams and Open in Microsoft 365 Copilot. Open in Teams shows the app card with your descriptions; click Open and the agent appears in Teams under Copilot > Agents. The first message shows a sign-in card: sign in once and it answers from then on.
Step 8: Publish to your whole organisation, with admin approval
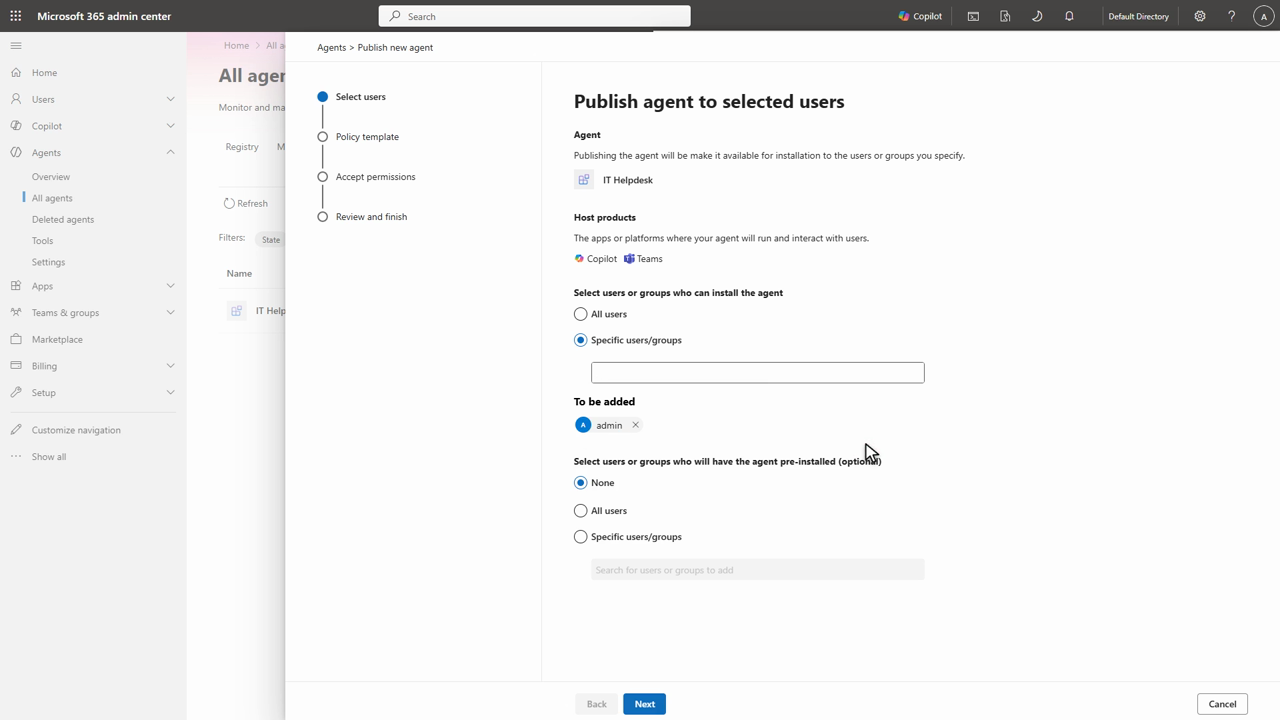
Back in Foundry: Publish > Teams & Microsoft 365 Copilot > Edit display details, bump the version (for example 1.0.1), choose People in your organization and publish. This sends a request to the Microsoft 365 admin center > Agents > All agents > Requests. Open it and choose Publish to store, then pick who can install it: all users, or specific users and groups (great for a pilot). Keep the default policy template, accept the permissions and finish.
Step 9: Update the agent without republishing
Because the active version is Always use latest, any change you save in Foundry reaches Teams straight away. I added one line to the instructions (“End every answer with: Was this helpful? Reply ‘ticket’ and I’ll tell you how to log one.”), saved, and the very next answer in Teams included it. You only republish to change the name, description or icon.
What Foundry created behind the scenes
Look in your resource group after publishing and you’ll find a new Azure Bot resource. It’s the bridge that passes messages between Teams and your agent. The Teams channel is free, but don’t delete this resource, or the agent stops working in Teams. Foundry also gives the published agent its own identity in Microsoft Entra ID, which leads straight to the first gotcha.
The three gotchas, explained
Gotcha 1: the agent signs in as itself
Think of the agent’s identity as a service account that belongs to the agent. When you test in the Foundry playground, the agent borrows your permissions, and as an admin you can probably see everything. Once it’s published, it uses its own identity, and that identity starts with no access to anything else.
In this demo that’s fine, because the IT policy PDF lives inside Foundry itself. But if your agent reads from other Azure services (an Azure AI Search index, a storage account full of documents, a SQL database), it will work perfectly in the playground and then fail, or say it can’t find anything, in Teams.
The fix: open that resource in the Azure portal, go to Access control (IAM) > Add role assignment, and give the agent’s identity the role it needs. For example, Search Index Data Reader on an Azure AI Search service, or Storage Blob Data Reader on a storage account.
Gotcha 2: locked-down (private) Foundry networks
Many organisations lock Foundry down so it can only be reached from their own network. That’s the public network access setting on the Foundry resource, under Networking. Teams and the Bot Service live in Microsoft’s cloud, outside your network, and the portal’s Publish button has to reach your project too. So with public access turned off, publishing from the portal fails.
The fix: publish with the Foundry REST API from a machine inside your network instead, following Microsoft’s “publish agents to Microsoft 365 Copilot and Teams” documentation. If your Foundry project is open to the internet (like the one in this demo), you can ignore this one.
Gotcha 3: your data and compliance
Once the agent is in Teams, every question and answer is handled by Microsoft 365 and Teams as well as Azure, and the publish screen even shows a notice that data will leave the Azure compliance boundary. Chats can also fall under your Teams retention and eDiscovery policies, just like normal chats.
For an IT helpdesk answering from a policy everyone can already read, that’s usually fine. But if your agent will touch HR, finance or customer data, check with your compliance or data protection team first. Then roll it out in stages: Just you, then a small pilot group (choose specific users or groups during admin approval), then everyone.
Two more things that caught me out
- “Disallowed by Azure” MFA error under Azure bot services when publishing. Azure now refuses to create resources from a sign-in without multi-factor authentication, and publishing creates the Azure Bot. Sign out, close the browser, and sign in again with MFA.
- A “Just you” agent doesn’t appear in Teams > Apps > Manage your apps. Use Open in Teams from Foundry’s Publish menu instead. The first message then shows a one-time sign-in card.
Contents of the video
- 00:00 What you’ll build
- 01:29 What you need
- 02:30 Create the agent
- 02:58 Add the IT policy as knowledge
- 03:40 Write the instructions
- 04:29 Test it in the playground
- 05:06 Choose the active version
- 05:31 Publish to Teams, just for you
- 06:21 Open it in Teams
- 06:45 Chat with the agent in Teams
- 07:34 Publish to the whole organisation
- 08:09 Admin approval in the Microsoft 365 admin center
- 09:02 Update the agent without republishing
- 09:56 What Foundry created behind the scenes
- 10:28 Gotcha 1: The agent signs in as itself
- 11:19 Gotcha 2: Locked-down Foundry networks
- 12:07 Gotcha 3: Your data and compliance
- 12:56 Wrap-up
